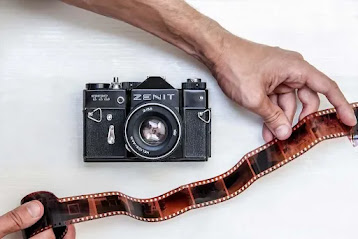
Using a 35mm film Camera
In the time of digital cameras, it might appear to be odd to train you how to utilize "old" 35mm cameras. In any case, there are many individuals out there who decide to shoot film for creative (and other) reasons. Furthermore, with computerized gobbling up portion of the overall industry for almost everything except scene photography, wonderful 35mm camera gear is less expensive than ever.
There might be a lot a greater amount of you out there who need to utilize film cameras yet think that they are threatening. Perhaps you've gained a film camera that somebody was parting with and have no clue about how to utilize one. This guide will help you through a portion of the peculiarities of film cameras that cutting edge simple to use computerized cameras either don't have or have robotized away.
Search for a few essential controls on the camera. Not all cameras will have these, and some probably won't actually have any of them, worry don't as well in the event that you see something depicted that isn't on your camera. We'll allude these later in the article, so it's really smart to find out more about them now.
The screen speed dial sets the shade speed, for example the ideal opportunity for which the film is presented to light. More current (1960s and onwards) cameras will show this in customary additions like 1/500, 1/250, 1/125, and so on. More established cameras utilize odd and apparently inconsistent qualities.
The gap ring controls the gap, which is a little opening close to the front of the lens.[1]These are typically set apart in standard augmentations, and almost any focal point will have settings of f/8 and f/11. The gap ring is as a rule on the focal point itself, yet not consistently; some later (1980s and onwards) SLRs will permit this to be controlled from the actual camera, for instance. A few frameworks (like Ordinance EOS) don't have opening rings by any means.
A bigger opening (more modest number, as the size of the gap is communicated as a proportion against the central length) implies a more limited profundity of field (for example less of your scene in concentration), and all the more light being let onto the film. A more modest gap will let less light onto the film, and give more profundity of field. For instance, with a 50mm centered to 8 feet (2.4 m), at a gap of f/5.6, the piece of your scene from around 6.5 to 11 feet (2.0 to 3.4 m) would be in center. At a gap of f/16, the part from around 4.5 to 60 feet (1.4 to 18.3 m) would be in center.
The ISO dial, which might be set apart as ASA, tells the camera the speed of your film. This may not be a dial by any means; it very well may be a progression of button presses. One way or the other, this is essential for cameras that have programmed openness systems, as various movies will require an alternate openness; ISO 50 film will require an openness two times the length of an ISO 100 film, for instance.
On certain cameras, this isn't required, and some of the time it's not even imaginable; a lot later cameras read the film speed from electrical contacts on the film cartridge itself. In the event that your camera has electrical contacts inside the film chamber, it's a DX-proficient camera. This normally "simply works", so don't stress over this to an extreme.
The mode dial sets different programmed openness modes, assuming your camera has them accessible. This is normal on completely programmed electronic SLRs from the last part of the 80s onwards. Unfortunately, all cameras call their modes various things; for instance, Nikon refer to shade need as "S", and Ordinance mysteriously refer to it as "Television". We'll investigate this later, yet you need to keep it in "P" (significance program programmed) more often than not.
The centering ring centers the focal point to the distance to your subject. This will for the most part have distances in the two feet and meters, as well as a ∞ checking (for centering an endless distance away). A few cameras will, all things being equal, have centering zones, in some cases with charming little images stamping what the zones are.
The rewind discharge permits you to rewind your film. Typically, while shooting the film is locked with the goal that it can move advances and not in reverse into the canister, for clear reasons. The rewind discharge just opens this wellbeing component. This is generally a little button situated on the foundation of the camera, marginally recessed into the body, however a few cameras are strange and have it somewhere else.
The rewind wrench allows you to wind your film once again into the canister. It's generally on the left-hand-side, and as a rule has a little flip-out switch to make it more straightforward to turn. A few mechanized cameras don't have this by any stretch of the imagination, and on second thought deal with rewinding your film without anyone else, or have a change to make it happen.
Change your battery assuming your camera has one. Essentially all batteries for each 35mm camera made can be gotten inexpensively, since they don't utilize restrictive batteries like most advanced cameras, and they last almost everlastingly; you can't stand to not transform them.
A couple of more established cameras will expect 1.35v PX-625 mercury batteries, which are extremely challenging to get now and have no voltage guideline circuits to adapt to the generally accessible 1.5v PX625 batteries. You can get around this by one or the other examination (shoot a roll of film and check whether your openness is out, and repay in like manner), or utilize a piece of wire to wedge a #675 cell into the battery compartment.
Make sure that a film isn't now stacked. It's a simple error to make: snagging a camera, opening up the back, and finding a film previously stacked (and, subsequently, destroying a decent piece of the film). Have a go at winding the camera on; press the shade button first on the off chance that it declines to. On the off chance that your camera has a rewind wrench or handle on the left hand side, you will see it turning. (Instructions to do this on engine driven cameras without a rewind wrench is left as an activity for the peruser.)
Load your film. Despite the fact that 35mm movie cartridges are intended to be light-evidence, it's as yet a poorly conceived notion to do this in direct daylight. Go inside, or if nothing else into the shade. There are two sorts of cameras you'll need to stress over, and one in particular that you're probably going to experience:
Back stacking cameras are the simplest, and the most widely recognized; they have a pivoted back which opens to uncover the film chamber. In some cases (particularly on SLR cameras), you do this by lifting the rewind wrench upwards. Different cameras will open through an assigned switch. Space the film canister into its chamber (ordinarily, on the left hand side) and haul the film chief out. Some of the time you'll have to slide the pioneer into a space in the take-up spool; on others, you essentially haul the pioneer out until the tip lines up with a hued mark.
After you have done this, nearby the rear of the camera. A few cameras will naturally twist on to the main edge; in any case, make a few efforts of nothing specifically, wind the camera on. In the event that you have an edge counter that peruses upwards from 0, wind on until the casing counter arrives at 0. A couple of more established cameras count down, thus will expect that you set the casing counter physically to the quantity of openings that your film has. Utilize the means given before to confirm that the film is appropriately stacked.
Base stacking cameras, for example, early Leica, Zorki, Took care of and Zenit cameras, are to some degree more uncommon, and furthermore fairly more troublesome. As far as one might be concerned, you'll have to truly cut your film with the goal that it has a more extended, more slender pioneer. Mark Tharp has a fantastic website page depicting the technique.
Set the film speed. As a rule, you ought to set it to equivalent to your film. A few cameras will reliably finished or under-uncover by a specific sum; shoot a slide film to tentatively decide this.
When your camera is set up, you can go out into the large blue room and take a few extraordinary photos. More established cameras, in any case, will expect that you set many (at times every one) of the things that a cutting edge film or computerized camera would deal with for you naturally.
Center your shot. We'll detail this first since some old SLR cameras need their gaps halted down to meter; this makes the viewfinder a lot more obscure, and makes it harder to see when you're in center or not.
Auto-center cameras, normal since the mid-1980s onwards, are the most straightforward. In the event that you either have no centering ring, or a manual/auto center change up either the focal point or the camera, then, at that point, you presumably have a self-adjust camera. Basically half-press the shade tenderly to center. At the point when center is gotten (as a rule by some sign in the viewfinder, or perhaps by an irritating blaring sound), then the camera is prepared to make an effort. Luckily, most (likely all) auto-center cameras have programmed openness also, and that implies that you can securely overlook the subsequent stage about setting openness.
Manual-center single-focal point reflex cameras are somewhat more abnormal. SLRs are discernable by their huge focal "bump" lodging the viewfinder and their pentaprism (or pentamirror). Turn your centering ring until the picture in the viewfinder is sharp. Most manual-center cameras will have two centering helps to make it more straightforward to tell when you're in wonderful concentration. One is a parted screen, solidly in the middle, what divides the pictures into two pieces, which are adjusted when the picture is in center. The other, a microprism ring around the beyond the split screen, will cause any defocus to be undeniably more clear than it would be in any case. A not many will have a center affirmation pointer in the viewfinder when center is gotten. Utilize these centering helps assuming that you have them.
Manual-center rangefinder cameras are close to as simple. Coupled rangefinder cameras show two pictures of a similar subject through the viewfinder, one of which moves as you turn the centering ring. At the point when the two pictures agree and meld into one, the picture is in focus.[4]
Some more established rangefinder cameras don't have a coupled rangefinder of this sort. On the off chance that this is what you have, track down the ideal distance through the rangefinder, and afterward set that worth on the centring ring, a viewfinder camera from the 1950s.
Viewfinder cameras seem to be rangefinder cameras, however offer little help with tracking down the distance to your subject. Either utilize an outer rangefinder, or surmise the distance and set that on your centring ring.
Set your openness. Recall that more seasoned cameras have inept meters; they just read a little region at the focal point of the screen. So in the event that your subject is askew, point the camera at the subject, meter, and afterward reevaluate your shot. The particulars of getting a decent openness contrast from one camera to another:
Completely programmed openness cameras are the easiest.[5]If your camera has no controls for screen speed and gap, then, at that point, it's presumably one of these cameras (in the same way as other conservative cameras, most strikingly the Olympus Outing 35). Any other way, the camera might have a "Program" or "Programmed" mode; on the off chance that it does, save yourself a ton of problem and use it. Current Nikon and Group SLRs, for instance, will have a mode dial that you ought to go to "P". Assuming you have the choice, set your metering mode to "Network", "Evaluative" or comparative and have some good times.
Cameras with opening need programmed openness (like the Ordinance AV-1) will permit you to set a gap, and afterward pick a screen speed for you. On the vast majority of these, fair set an opening as indicated by how much light you have as well as your necessary profundity of field, and let the camera wrap up. Normally, don't pick a gap that will require your camera to utilize a quicker screen or more slow speed than it has accessible.
On the off chance that conditions license (and you don't need either a very shallow or incredibly profound profundity of field), then, at that point, don't shoot your focal point either at its biggest opening, and don't stop it down past f/11 or somewhere in the vicinity. Virtually all focal points are somewhat more honed halted down than they are totally open, and all focal points are restricted by diffraction at little gaps.
Cameras with screen need programmed openness, which isn't really an unmistakable class of camera from the above mentioned, will permit you to pick a shade speed and afterward it will set a gap naturally. Pick a screen speed as indicated by how much light you have and whether you need to freeze (or obscure) movement.
Obviously, this must be sufficiently long to guarantee that your focal point really has an opening wide to the point of matching the screen speed, yet quickly enough that your focal point has a gap sufficiently little (thus that you're ready to hand-hold the camera, on the off chance that that is the thing you're doing, and you ought to be), an extremely normal completely manual SLR camera.]] Completely manual cameras will expect you to set both gap and shade speed yourself. A large portion of these will have a match-needle meter in the viewfinder which will show either finished or under-openness; on the off chance that the needle goes over the center imprint your photograph will be over-uncovered, and assuming that it goes beneath it will be under-uncovered. You ordinarily meter by half-squeezing the screen; a few cameras, for example, Praktica L-series bodies will have a devoted metering key to do this (which likewise stops the focal point down). Set either your gap, shade speed, or both, contingent upon the necessities for your scene, until the needle sits pretty much at the midway imprint. On the off chance that you're shooting negative film (as opposed to slide film), it doesn't hurt a piece for the needle to go somewhat over the midway imprint; negative film has an enormous capacity to bear over-openness.
In the event that you don't have a meter in the viewfinder, utilize an openness table[6], your memory of one, or an outer light meter- - the best kind is a computerized camera; an out of date reduced one is fine yet you'll believe it should show the openness perusing in the viewfinder.[7](Remember that you can make counterbalancing changes in gap and shade speed). Or on the other hand attempt a free light-metering program for a cell phone, like Photography Colleague for Android.
Outline your shot and shoot. The imaginative components of creating a photo is well external the extent of this article, yet you will discover a few helpful pointers in How to Take Better Photos and How to Foster Your Photography Abilities.
To click a decent photograph, you ought to have in any event, lighting all over, and it ought not be too splendid in the background.[9]
Assuming you snap your picture remaining in the sun, remember that you ought to confront away from the sun.
Shoot till you hit the finish of the roll. You'll know when you're there when either the camera won't twist on (for those cameras with programmed winders), or in any case while winding the film on turns out to be undeniably challenging (in the event that this is you, don't compel it). It will not really be the point at which you've spent 24 or 36 openings (or anyway numerous you have on your film); a few cameras will permit you to drain up to an additional 4 casings over the evaluated number. At the point when you arrive, you'll have to rewind the film. A few mechanized cameras do this consequently when you hit the finish of the roll; a few other mechanized ones will have a rewind switch. If you don't, just relax. Press your rewind discharge button. Presently turn your rewind wrench toward the path demonstrated on the wrench (normally clockwise). You'll see that close to the furthest limit of the film the wrench gets stiffer, and afterward turns out to be exceptionally simple to turn. At the point when you hit this, quit winding and open the back.
Get your film created. In the event that you're shooting negative film then luckily you can in any case finish this almost anyplace. Slide film and conventional highly contrasting film requires altogether different cycles; check with a neighbourhood camera store in the event that you really want assistance tracking down somebody to foster your film for you. You can likewise foster film at home with the right supplies.
Actually take a look at your film for openness issues. Search for clear under-and over-openness. All movies will quite often look terrible and cloudy when underexposed; slide movies will blow features almost as promptly as computerized cameras when overexposed. In the event that these things don't demonstrate unfortunate procedure, (for example, metering on some unacceptable piece of your scene), it implies that your meter is off-base or that your screen is erroneous. Set your ISO speed physically, as portrayed prior. For instance, on the off chance that you're underexposing on ISO 400 film, set the ISO dial to 200 or somewhere in the vicinity.


Comments
Post a Comment